The Importance of RV Inspections
Why RV Inspections Matter
RV inspections are essential for several reasons. First, they help identify potential issues before they become major problems. A thorough inspection can uncover hidden damage, leaks, or mechanical failures that could jeopardize your safety on the road.
Second, regular inspections can enhance the longevity of your RV. Just like any vehicle, RVs require maintenance to keep them running smoothly. By addressing minor issues early, you can avoid more significant repairs down the line.
Lastly, if you plan to sell your RV, having a recent inspection report can increase its value. Buyers are more likely to invest in a well-maintained vehicle with a comprehensive inspection report.
What to Expect During an RV Inspection
Understanding what happens during an RV inspection can help you prepare. Here’s a breakdown of the typical process:
1.
Initial Assessment: The technician will start with a visual inspection of the exterior and interior. They will look for signs of wear, damage, or leaks.
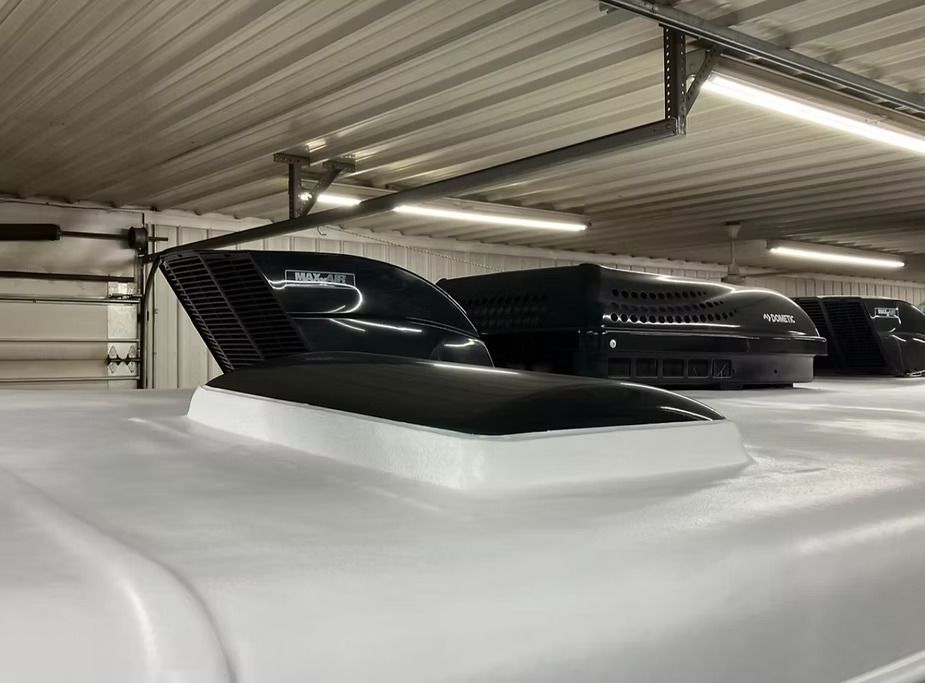
2. Roof Inspection: A thorough roof inspection is essential to maintaining the integrity and safety of your RV. The inspection includes:
- Sealant Condition: Checking for signs of dry rot, cracks, or shrinkage in all sealant areas.
- Membrane Health: Inspecting for damage, tears, or wear in the roof membrane.
- Water Intrusion: Identifying any signs of leaks or moisture penetration.
- Roof Units & Vents: Examining all roof-mounted components, including vents, AC units, and skylights, for wear and tear or potential failure points.
3. Electrical System Evaluation: The electrical systems, including lights, outlets, and appliances, will be tested to ensure they are operational.
4. Plumbing Inspection: The plumbing system will be checked for leaks and proper function. This includes water tanks, pipes, and fixtures.
5.
Final Report: After the inspection, you will receive a detailed report outlining any issues found and recommendations for repairs.
The Benefits of Regular RV Inspections
Regular RV inspections offer numerous benefits. Here are a few key advantages:
- Safety: Regular inspections help ensure your RV is safe to drive. This can prevent accidents caused by mechanical failures.
- Cost Savings: By identifying issues early, you can save money on repairs. Minor problems can often be fixed before they escalate into major expenses.
- Peace of Mind: Knowing your RV has been inspected gives you confidence on the road. You can focus on enjoying your travels rather than worrying about potential issues.
- Increased Resale Value: A well-maintained RV with documented inspections can fetch a higher price when it comes time to sell.
Preparing for Your RV Inspection
To ensure a smooth inspection process, here are some tips for preparing your RV:
- Clean Your RV: A clean RV allows the technician to perform a thorough inspection. Remove any personal items and clean the interior and exterior.
- Full Hookups: Your RV should be somewhere that can be connected to full hookups so all systems can be thoroughly tested by the technician.
- Gather Documentation: Have any maintenance records or previous inspection reports ready. This information can be helpful for the technician.
Final Thoughts on RV Inspections
Investing in regular RV inspections is a smart choice for any RV owner.
Remember, a well-maintained RV not only enhances your travel experience but also protects your investment. So, take the time to schedule regular inspections and enjoy peace of mind on the road.

Technician performing an RV engine inspection at a service center
Getting the Interior Ready
The interior of your RV also needs winterization to ensure it remains in good condition. Here are some effective tips:
- Remove Perishable Items: Clear out any food items that could spoil or freeze.
- Clean Thoroughly: Vacuum and wipe down all surfaces to reduce the risk of mold and mildew.
- Open Cabinet Doors: Keeping cabinet doors open encourages warm air circulation, which helps prevent pipes from freezing.
- Use Moisture Absorbers: These can help keep humidity levels in check, further preventing mold growth.
Taking Care of the Battery
Your RV's battery requires careful handling during winterization. Here’s what you should do:
- Disconnect the Battery: For long-term storage, it's wise to disconnect the battery to prevent drain.
- Charge the Battery: Ensure that it's fully charged before storing.
- Store It Warm: Whenever possible, keep the battery in a warmer location to help prevent freezing.
Performing a Final Review
After completing the steps outlined, take a moment for a final inspection:
- Check Tires: Ensure your tires are properly inflated (ideally to the manufacturer’s recommended psi) and check for signs of wear.
- Secure Doors and Windows: Make sure everything is locked and sealed to keep moisture and pests from entering.
- Document Your Winterization Process: Keeping a record of your completed tasks can be invaluable for future winterization preparations.
Wrapping Up
Winterizing your RV is a necessary task that demands attention. By following this checklist, you can safeguard your investment and ensure your RV is primed for the next adventure when the temperatures rise. Taking a little time now can save you considerable hassle and expense later. So gather your supplies, complete the steps listed above, and enjoy the peace of mind that comes with knowing your RV is fully winter-ready.